As a coffee enthusiast, I’ve spent countless mornings perfecting my espresso shots. But like many, I’ve faced the frustrating issue of under-extracted espresso. You know the type: sour, thin, and utterly lacking that rich complexity we crave. Through trial and error (and a fair amount of caffeine), I’ve uncovered strategies to turn under-extracted espresso into a beautifully balanced cup. Let me share what worked for me.
What Is Under Extracted Espresso and Why Does It Happen?
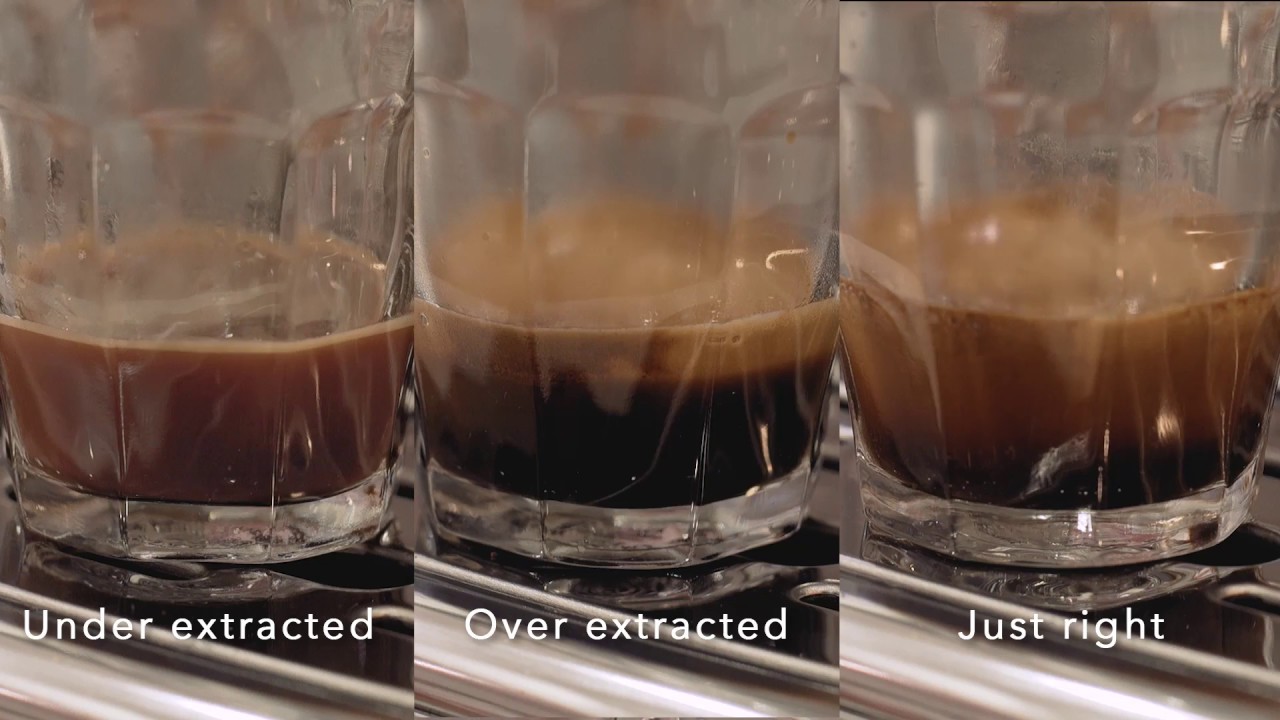
Under-extracted espresso occurs when water passes too quickly through the coffee grounds, failing to pull out the full range of flavors. Instead of that velvety, bittersweet harmony, you’re left with something sharp and unbalanced. The culprits? Often, it’s grind size, water temperature, tamping, or shot timing.
In my experience, understanding why under-extraction happens is the first step to fixing it. After all, espresso is an art and a science. Let’s break down the solutions.
How to Fix Under Extracted Espresso: Adjusting Grind Size
One of the first things I tackled was the grind size. Espresso demands precision, and even small adjustments can drastically impact the result. If your espresso tastes under-extracted, it’s often because the grind is too coarse, allowing water to rush through without fully saturating the coffee.
I started by making the grind finer, testing in small increments. A finer grind slows water flow, increasing contact time with the coffee, which helps extract more flavor. It took patience, but with each adjustment, I noted improvements.
Pro Tip: Use a burr grinder for consistency. Blade grinders often create uneven particles, which can lead to uneven extraction.
If you're looking for a machine that helps maintain precision with an integrated grinder, the Philips 5400 LatteGo Review highlights a great option for consistent results.
Tamping: Perfecting the Pressure
Tamping felt like an art I had to master. Initially, I wasn’t tamping consistently enough, which caused water to find paths of least resistance, leading to uneven extraction.
The trick? Applying even, firm pressure without going overboard. Around 30 pounds of force worked for me—enough to compress the grounds into a uniform puck but not so much that I strained my wrist. I also checked for level tamping. A tilted puck can cause water to pool on one side, exacerbating under-extraction.
If you’re still struggling, try a calibrated tamper to ensure you’re applying consistent pressure every time. Machines like those compared in Philips 3200 vs 5400 often have built-in features that aid in achieving even extraction.
How to Fix Under Extracted Espresso: Dialing in Shot Timing
When my espresso shots were pulling in less than 20 seconds, I knew timing was an issue. An under-extracted shot often pours too fast, producing a thin, watery stream.
Through experimentation, I found that aiming for a shot time of 25-30 seconds worked best. If your shots are too quick, grind finer, adjust your dose, or tamp more firmly to slow the water flow. Conversely, if they’re too slow, try a coarser grind or lighter tamp. If you're considering upgrading your machine to one that makes adjustments easier, you may want to check out the Philips LatteGo 5400 vs 4300 comparison to see which model fits your needs best.

Water Temperature Matters
I underestimated how much water temperature impacts espresso. Water that’s too cool (below 195°F) can lead to under-extraction, as it doesn’t adequately dissolve the coffee’s flavors.
I invested in a thermometer and started measuring my water temperature. My sweet spot was between 195°F and 205°F. Many modern espresso machines have built-in temperature controls, but if yours doesn’t, you can preheat your equipment or manually test the water. If you're interested in an espresso machine with precise temperature control, the Philips 3200 vs 4300 vs 5400 comparison breaks down some excellent models with customizable settings.
Choosing the Right Coffee Beans
Believe it or not, some beans are more forgiving than others. I experimented with different beans and found that medium or dark roasts worked better for espresso. Lighter roasts often need a finer grind and more precise extraction times, making them trickier for beginners.
Freshness is another key factor. Coffee beans start to lose flavor within two weeks of roasting. I now buy smaller quantities and grind them just before brewing to maximize freshness.
How to Fix Under Extracted Espresso with Proper Dosing
When I first started making espresso, I didn’t realize how critical dosing was. Too little coffee in the portafilter creates under-extracted shots because the water flows through too quickly.
I began using a kitchen scale to weigh my doses, aiming for 18-20 grams for a double shot. Precision matters here. Even a one-gram difference can throw off your extraction.
Pro Tip: Consistency is everything. Use the same dose every time and adjust other variables as needed.
If you're looking for an espresso machine with pre-programmed dosing and automation, the Philips 3200 vs 4300 breakdown can help you choose one that fits your workflow.
Cleaning and Maintenance Are Non-Negotiable
Dirty equipment can sabotage even the best espresso-making techniques. Oils and residue from previous brews can clog your machine, leading to uneven water flow and under-extraction.
I now make it a habit to clean my machine daily. I backflush the group head, scrub the portafilter, and descale my machine regularly to ensure everything operates smoothly.
Experimenting with Pre-Infusion
Pre-infusion turned out to be a game-changer for me. This technique involves wetting the coffee puck with a small amount of water before applying full pressure. It allows the grounds to expand and reduces the chance of channeling, which can cause under-extraction.
If your machine has a pre-infusion feature, experiment with the settings. I found that a pre-infusion time of 3-5 seconds improved my extraction significantly.
The Role of Crema in Diagnosing Issues
I also learned to pay attention to the crema—the golden layer of foam on top of the espresso. A pale or thin crema often indicates under-extraction.
By fixing the factors above, I noticed my crema became richer and more uniform, a visual cue that I was on the right track.
How to Fix Under Extracted Espresso: Practice Makes Perfect
Fixing under-extracted espresso took time, patience, and plenty of trial and error. I kept a journal to track my variables—grind size, dose, tamp pressure, and shot timing—so I could identify what worked and what didn’t.
Each adjustment brought me closer to that perfect shot. Eventually, I reached a point where I could consistently pull delicious, well-extracted espresso.
If you’re in the market for a new machine that allows more precise control over these factors, take a look at the Philips 5500 LatteGo Review to see if it aligns with your espresso-making needs.
Common Mistakes to Avoid
Along the way, I made plenty of mistakes. Here are some pitfalls to watch out for:
- Skipping Warm-Up: Always let your machine warm up properly before pulling a shot. Cold equipment can lead to under-extraction.
- Ignoring Your Water: Use filtered water to avoid mineral buildup and off-flavors.
- Over-Tamping: Applying too much pressure can cause over-compaction, leading to uneven water flow.
- Rushing the Process: Espresso requires focus and care. Take your time to get it right.
Final Thoughts: Perfect Your Espresso Craft
The journey to fixing under-extracted espresso taught me the value of persistence and attention to detail. Each step, from tweaking the grind to mastering tamping, brought me closer to the perfect brew.
Now, every time I pull a shot, I savor not just the flavor but also the process. There’s something deeply satisfying about transforming simple coffee beans into liquid gold.
If you’re struggling with under-extraction, don’t be discouraged. Keep experimenting, and remember: every shot is a step toward mastery. Cheers to better espresso!
Frequently Asked Questions (FAQs)
Q: What does under-extracted espresso taste like?
A: Under-extracted espresso often tastes sour, acidic, and thin. It lacks the richness, sweetness, and balance of a well-extracted shot.
Q: How do I know if my grind size is correct?
A: The grind size should be fine but not powdery. If your shot pulls too quickly (under 20 seconds), the grind is likely too coarse. Adjust it finer in small increments until the extraction time is within 25-30 seconds.
Q: How much pressure should I apply when tamping?
A: Aim for about 30 pounds of pressure when tamping. The goal is to create a level, compact puck that allows water to flow evenly through the grounds.
Q: Can I fix under-extracted espresso without changing my grind size?
A: Yes, you can also adjust other variables like tamp pressure, shot timing, or water temperature. However, grind size is often the most effective adjustment.
Q: What is pre-infusion, and does it help with under-extraction?
A: Pre-infusion wets the coffee puck with a small amount of water before full pressure is applied. This helps the grounds expand evenly and can reduce channeling, which improves extraction.
Q: Why does the water temperature matter for espresso?
A: If the water is too cool (below 195°F), it won’t dissolve the coffee’s flavors properly, leading to under-extraction. Aim for a temperature between 195°F and 205°F.
Q: Can I use any coffee beans for espresso?
A: While you can use any beans, medium and dark roasts tend to work best for espresso because they extract more easily and deliver a balanced flavor profile.
Q: How often should I clean my espresso machine?
A: Clean your machine daily to prevent residue buildup, which can cause uneven water flow and negatively impact your espresso’s flavor.
Q: What is crema, and how does it relate to under-extraction?
A: Crema is the golden foam on top of an espresso shot. A thin or pale crema often indicates under-extraction, while a rich, consistent crema signals a well-extracted shot.
Q: What shot time should I aim for?
A: Aim for a shot time between 25-30 seconds for a double shot. If the shot pulls too quickly, adjust the grind finer or tamp more firmly.